

快速开始
前言
Longbridge OpenAPI SDK 基于 Rust 底层提供标准实现,目前我们已经发布了 Python、Node.js、Rust、C++/C、Java 等多种编程语言 SDK,其他语言的支持后面会陆续推出。
API Host
- HTTP API -
https://openapi.longbridge.com - WebSocket Quote -
wss://openapi-quote.longbridge.com - WebSocket Trade -
wss://openapi-trade.longbridge.com
Info
中国大陆地区可使用 .cn 域名提升访问速度:
- HTTP API -
https://openapi.longbridge.cn - WebSocket Quote -
wss://openapi-quote.longbridge.cn - WebSocket Trade -
wss://openapi-trade.longbridge.cn
SDK 会自动选择接入点;若判断不正确,可设置环境变量 LONGBRIDGE_REGION(如 cn、hk)。
接入点与数据中心
两个容易混淆的概念:
- 接入点(
.com/.cn)— 仅是网络路由。两者数据一致、鉴权一致,一方签发的 token 另一方同样接受。 - 数据中心(
ap/us)— 账户本身所在的位置,决定了哪些美股专属接口可用。
两者不能自由组合:
| 数据中心 | .com | .cn |
|---|---|---|
us(美国账户) | 支持,且是唯一接入点 | 不支持 |
ap(新加坡 / 香港) | 支持 | 支持 |
.cn 没有通往美国数据中心的链路,因此美国账户必须始终使用 .com 域名,登录同样如此 —— .cn 的登录页不提供美国账户选项。
时间格式
所有 API 返回有关时间的字段,我们都采用 Unix Timestamp 时区为 UTC。
环境需求
CLI 快速入门
如果你不需要写代码,Longbridge CLI 提供更轻量的接入方式——安装即用,OAuth 一键授权,无需配置环境变量。
安装
brew install --cask longbridge/tap/longbridge-terminalcurl -sSL https://open.longbridge.com/longbridge/longbridge-terminal/install | shscoop install https://open.longbridge.com/longbridge/longbridge-terminal/longbridge.jsoniwr https://open.longbridge.com/longbridge/longbridge-terminal/install.ps1 | iex登录
longbridge auth login浏览器会自动打开授权页面,完成后 Token 自动保存,后续无需重复操作。
快速验证
longbridge quote AAPL.US TSLA.US    # 实时行情
longbridge positions                 # 查看持仓
longbridge --help                    # 查看全部可用命令
查看完整命令列表见 CLI 参考文档。
安装 SDK
包名变更
SDK 包名已从 longport 更名为 longbridge,旧包名 longport 已废弃。如果你之前使用的是 longport,请先卸载旧包再安装新包。
pip3 install longbridgeyarn add longbridge[dependencies]
longbridge = "4.0.5"
tokio = { version = "1", features = "rt-multi-thread" }<dependencies>
<dependency>
<groupId>io.github.longbridge</groupId>
<artifactId>openapi-sdk</artifactId>
<version>4.0.5</version>
</dependency>
</dependencies>go env -w GOPROXY="https://goproxy.io,direct"
go get github.com/longbridge/openapi-go下面我们以获取资产为例,演示一下如何使用 SDK。
配置
开通开发者账户
- 下载 Longbridge,并完成开户
- 从 Longbridge Developers 官网获取认证信息
认证方式
Longbridge Developers 支持两种认证方式:
方式一:OAuth 2.0(推荐) ⭐
OAuth 2.0 是现代化的认证方式,使用 Bearer Token,无需 HMAC 签名,更加安全便捷。第一步:注册 OAuth 客户端
执行以下命令注册 OAuth 客户端,获取 client_id:
curl -X POST https://openapi.longbridge.com/oauth2/register \
     -H "Content-Type: application/json" \
     -d '{
            "redirect_uris": ["http://localhost:60355/callback"],
            "token_endpoint_auth_method": "none",
            "grant_types": ["authorization_code","refresh_token"],
            "response_types": ["code"],
            "client_name": "My Longbridge OpenAPI"
        }'
$body = @{
redirect_uris = @("http://localhost:60355/callback")
token_endpoint_auth_method = "none"
grant_types = @("authorization_code", "refresh_token")
response_types = @("code")
client_name = "My Longbridge OpenAPI"
} | ConvertTo-Json
Invoke-RestMethod -Method POST `
-Uri "https://openapi.longbridge.com/oauth2/register" `
-ContentType "application/json" `
-Body $body响应示例:
{
  "client_id": "72d9caaf-0bd4-4000-85a7-8c7978c74544",
  "client_id_issued_at": 1773311221,
  "client_secret_expires_at": 1773314821,
  "client_name": "My Longbridge OpenAPI",
  "redirect_uris": ["http://localhost:60355/callback"],
  "grant_types": ["authorization_code", "refresh_token"],
  "token_endpoint_auth_method": "none",
  "response_types": ["code"],
  "registration_access_token": "BVlMLEtNUUu4FoRFNItC2FfeR/rLpqLNyEuCJNNTCWE=",
  "registration_client_uri": "https://openapi.longbridge.com/oauth2/register/72d9caaf-0bd4-4000-85a7-8c7978c74544"
}
保存 client_id 供后续使用。
第二步:授权并获取 Token
SDK 提供内置 OAuth 支持。使用 OAuthBuilder 完成浏览器授权流程,授权后使用 Config.from_oauth() 创建配置。Token 会自动持久化,过期时自动刷新。
Token 存储路径: macOS/Linux 为 ~/.longbridge/openapi/tokens/<client_id>,Windows 为 %USERPROFILE%\.longbridge\openapi\tokens\<client_id>。
from longbridge.openapi import Config, OAuthBuilder

oauth = OAuthBuilder("your-client-id").build(
    lambda url: print(f"请访问此 URL 进行授权:{url}")
)
config = Config.from_oauth(oauth)
import asyncio
from longbridge.openapi import Config, OAuthBuilder
async def main() -> None:
oauth = await OAuthBuilder("your-client-id").build_async(
lambda url: print(f"请访问此 URL 进行授权:{url}")
)
config = Config.from_oauth(oauth)
if __name__ == "__main__":
asyncio.run(main())const { Config, OAuth } = require('longbridge')
const oauth = await OAuth.build('your-client-id', (_, url) => {
console.log('请访问此 URL 进行授权:' + url)
})
const config = Config.fromOAuth(oauth)use std::sync::Arc;
use longbridge::{Config, oauth::OAuthBuilder};
#[tokio::main]
async fn main() -> Result<(), Box<dyn std::error::Error>> {
let oauth = OAuthBuilder::new("your-client-id")
.build(|url| println!("请访问此 URL 进行授权:{url}"))
.await?;
let config = Arc::new(Config::from_oauth(oauth));
Ok(())
}import com.longbridge.*;
public class Main {
public static void main(String[] args) throws Exception {
String clientId = "your-client-id";
OAuth oauth = new OAuthBuilder(clientId)
.build(url -> System.out.println("请打开此 URL 授权:" + url))
.get();
try (oauth) {
Config config = Config.fromOAuth(oauth);
}
}
}package main
import (
"context"
"fmt"
"log"
"github.com/longbridge/openapi-go/config"
"github.com/longbridge/openapi-go/oauth"
)
func main() {
o := oauth.New("your-client-id").
OnOpenURL(func(url string) { fmt.Println("请访问此 URL 进行授权:", url) })
if err := o.Build(context.Background()); err != nil {
log.Fatal(err)
}
conf, err := config.New(config.WithOAuthClient(o))
if err != nil {
log.Fatal(err)
}
_ = conf // 用于创建 TradeContext 或 QuoteContext
}#include <iostream>
#include <longbridge.hpp>
using namespace longbridge;
int main(int argc, char const* argv[]) {
const std::string client_id = "your-client-id";
OAuthBuilder(client_id).build(
[](const std::string& url) {
std::cout << "请访问此 URL 进行授权:" << url << std::endl;
},
[](auto res) {
if (!res) {
std::cout << "authorization failed: " << *res.status().message() << std::endl;
return;
}
Config config = Config::from_oauth(*res);
// 使用 config 创建 QuoteContext 或 TradeContext
});
std::cin.get();
return 0;
}OAuth 优势
- ✅ 更安全(无需共享密钥)
- ✅ 更简单(无需计算签名)
- ✅ 基于 Token 的现代认证方式
- ✅ 更适合现代应用程序
Token 安全
OAuth Token 应安全存储在应用程序中(如加密文件、安全密钥链),不要存储在环境变量中。
方式二:传统 API Key(兼容)
获取 App Key, App Secret, Access Token 等信息
请登录 https://open.longbridge.com/,进入用户中心。
页面会展示应用凭证(App Key、App Secret、Access Token)。此处的 Access Token 为旧版 API Key 凭证,与 OAuth 或 Refresh Token API 返回的 access token 不是同一种东西。获取后请设置为环境变量以便开发使用。
环境变量
Caution
请注意保护好您的 Access Token 信息,任何人获得到它,都可以通过 OpenAPI 来交易你的账户!
传统 API Key 凭证(仅需设置以下 3 个):
| 环境变量 | 说明 |
|---|---|
LONGBRIDGE_APP_KEY | 从页面上获取到的 App Key |
LONGBRIDGE_APP_SECRET | 从页面上获取到的 App Secret |
LONGBRIDGE_ACCESS_TOKEN | 在 https://open.longbridge.com/(用户中心 → 应用凭证)获取的旧版 Access Token,非 OAuth access token |
其他环境变量:
| 名称 | 说明 |
|---|---|
LONGBRIDGE_LANGUAGE | 语言标识,zh-CN、zh-HK 或 en(默认:en) |
LONGBRIDGE_HTTP_URL | HTTP 接口地址(默认:https://openapi.longbridge.com) |
LONGBRIDGE_QUOTE_WS_URL | 行情 WebSocket 地址(默认:wss://openapi-quote.longbridge.com/v2) |
LONGBRIDGE_TRADE_WS_URL | 交易 WebSocket 地址(默认:wss://openapi-trade.longbridge.com/v2) |
LONGBRIDGE_REGION | 覆盖接入点;SDK 会按网络自动选择,若判断不正确可设置(如 cn、hk) |
LONGBRIDGE_ENABLE_OVERNIGHT | 是否开启夜盘行情,true 或 false(默认:false);夜盘行情已包含在 US LV1 中免费提供,仅支持美股 |
LONGBRIDGE_PUSH_CANDLESTICK_MODE | K 线推送模式,realtime 或 confirmed(默认:realtime) |
LONGBRIDGE_PRINT_QUOTE_PACKAGES | 连接时是否打印行情包,true 或 false(默认:true) |
LONGBRIDGE_LOG_PATH | 日志文件路径(默认:不写日志) |
Info
SDK 同时支持旧版 LONGPORT_* 环境变量名以保持兼容。
建议您设置好这几个环境变量,我们后面各章节文档中的示例代码都会使用这几个环境变量。
关于环境变量
环境变量非必要条件,如设置不方便或遇到问题难以解决,可不用环境变量,而是直接在代码里用参数来初始化。
Longbridge OpenAPI SDK 的 Config 可使用 Config.from_apikey_env()(或 Node/Java 的 Config.fromApikeyEnv())从环境变量创建,或使用 Config.from_apikey(app_key, app_secret, access_token) 直接传参。见下方示例代码中的「不使用 ENV 初始化」注释。
macOS / Linux 环境下设置环境变量
打开终端,输入下面的命令即可:
export LONGBRIDGE_APP_KEY="从页面上获取到的 App Key"
export LONGBRIDGE_APP_SECRET="从页面上获取到的 App Secret"
export LONGBRIDGE_ACCESS_TOKEN="从页面上获取到的 Access Token"
Windows 下设置环境变量
Windows 要稍微复杂一些,有下面两种方式可以设置环境变量:
-
通过图形界面设置:在桌面上找到”我的电脑”,右键点击,选择”属性”,在弹出的窗口中点击”高级系统设置”。
-
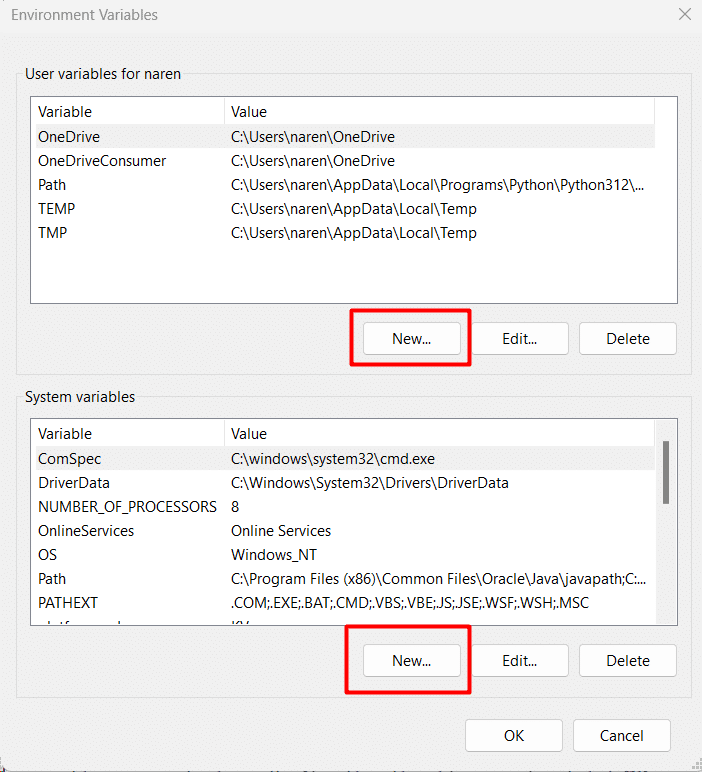
在弹出的窗口中点击”环境变量”。
-
在弹出的窗口中点击”新建”,然后输入环境变量名称,比如
LONGBRIDGE_APP_KEY,Value分别填写从页面上获取到的 App Key、App Secret、Access Token。
-
-
CMD 命令行设置:按下
Win + R快捷键,输入cmd命令启动命令行(建议使用 Windows Terminal 获得更好的开发体验)。在命令行里面输入下面的命令设置环境变量:
C:\Users\jason> setx LONGBRIDGE_APP_KEY "从页面上获取到的 App Key"
成功:指定的值已得到保存。

C:\Users\jason> setx LONGBRIDGE_APP_SECRET "从页面上获取到的 App Secret"
成功:指定的值已得到保存。

C:\Users\jason> setx LONGBRIDGE_ACCESS_TOKEN "从页面上获取到的 Access Token"
成功:指定的值已得到保存。
:::caution Windows 环境变量
Windows 环境变量限制,当上面命令执行成功以后,你需要重新启动 Windows 或者注销后重新登录一次,才可以读取到。
:::
注销或重新启动后,再次打开命令行,输入下面的命令验证一下环境变量是否设置正确:
C:\Users\jason> set LONGBRIDGE
LONGBRIDGE_APP_KEY=xxxxxxx
LONGBRIDGE_APP_SECRET=xxxxxx
LONGBRIDGE_ACCESS_TOKEN=xxxxxxx
如果能正确打印你刚才设置的值,那么环境变量就是对了。
刷新 Access Token
Info
本节仅适用于传统 API Key 认证方式。OAuth 2.0 的 Token 由 SDK 自动刷新。
传统 API Key 的 Access Token 默认 90 天后过期。在过期前调用 Config.refresh_access_token() 获取新 Token,然后将返回值更新到 LONGBRIDGE_ACCESS_TOKEN。
from datetime import datetime, timedelta
from longbridge.openapi import Config

config = Config.from_apikey("YOUR_APP_KEY", "YOUR_APP_SECRET", "YOUR_ACCESS_TOKEN")
# 指定 3 年后过期
new_token = config.refresh_access_token(expired_at=datetime.now() + timedelta(days=365 * 3))
print("新 Access Token:", new_token)
# 用新 token 创建新 Config,或将其持久化为 LONGBRIDGE_ACCESS_TOKEN
new_config = Config.from_apikey("YOUR_APP_KEY", "YOUR_APP_SECRET", new_token)
import asyncio
from datetime import datetime, timedelta
from longbridge.openapi import Config
async def main() -> None:
config = Config.from_apikey("YOUR_APP_KEY", "YOUR_APP_SECRET", "YOUR_ACCESS_TOKEN")
# 指定 3 年后过期
new_token = await config.refresh_access_token_async(expired_at=datetime.now() + timedelta(days=365 * 3))
print("新 Access Token:", new_token)
# 用新 token 创建新 Config,或将其持久化为 LONGBRIDGE_ACCESS_TOKEN
new_config = Config.from_apikey("YOUR_APP_KEY", "YOUR_APP_SECRET", new_token)
if __name__ == "__main__":
asyncio.run(main())const { Config } = require('longbridge')
const config = Config.fromApikey('YOUR_APP_KEY', 'YOUR_APP_SECRET', 'YOUR_ACCESS_TOKEN')
// 指定 3 年后过期
const expiredAt = new Date()
expiredAt.setFullYear(expiredAt.getFullYear() + 3)
const newToken = await config.refreshAccessToken(expiredAt)
console.log('新 Access Token:', newToken)
// 用新 token 创建新 Config,或将其持久化为 LONGBRIDGE_ACCESS_TOKEN
const newConfig = Config.fromApikey('YOUR_APP_KEY', 'YOUR_APP_SECRET', newToken)use longbridge::Config;
use time::{Duration, OffsetDateTime};
#[tokio::main]
async fn main() -> Result<(), Box<dyn std::error::Error>> {
let config = Config::from_apikey("YOUR_APP_KEY", "YOUR_APP_SECRET", "YOUR_ACCESS_TOKEN")?;
// 指定 3 年后过期
let expired_at = OffsetDateTime::now_utc() + Duration::days(365 * 3);
let new_token = config.refresh_access_token(Some(expired_at)).await?;
println!("新 Access Token:{}", new_token);
// 用新 token 创建新 Config,或将其持久化为 LONGBRIDGE_ACCESS_TOKEN
let new_config = Config::from_apikey("YOUR_APP_KEY", "YOUR_APP_SECRET", &new_token)?;
Ok(())
}import com.longbridge.Config;
import java.time.OffsetDateTime;
public class Main {
public static void main(String[] args) throws Exception {
Config config = Config.fromApikey("YOUR_APP_KEY", "YOUR_APP_SECRET", "YOUR_ACCESS_TOKEN");
// 指定 3 年后过期
OffsetDateTime expiredAt = OffsetDateTime.now().plusYears(3);
String newToken = config.refreshAccessToken(expiredAt).get();
System.out.println("新 Access Token:" + newToken);
// 用新 token 创建新 Config,或将其持久化为 LONGBRIDGE_ACCESS_TOKEN
Config newConfig = Config.fromApikey("YOUR_APP_KEY", "YOUR_APP_SECRET", newToken);
}
}#include <ctime>
#include <iostream>
#include <longbridge.hpp>
using namespace longbridge;
int main() {
Config config = Config::from_apikey("YOUR_APP_KEY", "YOUR_APP_SECRET", "YOUR_ACCESS_TOKEN");
// 指定 3 年后过期(Unix 时间戳)
int64_t expired_at = static_cast<int64_t>(std::time(nullptr)) + 3LL * 365 * 24 * 3600;
config.refresh_access_token(expired_at, [](auto res) {
if (!res) {
std::cerr << "错误:" << *res.status().message() << std::endl;
return;
}
std::cout << "新 Access Token:" << *res << std::endl;
// 用新 token 创建新 Config,或将其持久化为 LONGBRIDGE_ACCESS_TOKEN
Config new_config = Config::from_apikey("YOUR_APP_KEY", "YOUR_APP_SECRET", *res);
});
std::cin.get();
return 0;
}expired_at 参数用于指定新 Token 的过期时间(默认:从现在起 90 天后)。
场景示范
获取资产总览
创建 account_asset.py 贴入下面的代码:
from longbridge.openapi import TradeContext, Config, OAuthBuilder

oauth = OAuthBuilder("your-client-id").build(
    lambda url: print(f"请访问此 URL 进行授权:{url}")
)
config = Config.from_oauth(oauth)
# 或使用 API Key:config = Config.from_apikey_env()
# 或不使用 ENV:config = Config.from_apikey("YOUR_APP_KEY", "YOUR_APP_SECRET", "YOUR_ACCESS_TOKEN")

ctx = TradeContext(config)
resp = ctx.account_balance()
print(resp)
运行
python account_asset.py创建 account_asset_async.py 贴入下面的代码:
import asyncio
from longbridge.openapi import AsyncTradeContext, Config, OAuthBuilder

async def main() -> None:
    oauth = await OAuthBuilder("your-client-id").build_async(
        lambda url: print(f"请访问此 URL 进行授权:{url}")
    )
    config = Config.from_oauth(oauth)
    ctx = AsyncTradeContext.create(config)
    resp = await ctx.account_balance()
    print(resp)

if __name__ == "__main__":
    asyncio.run(main())
运行
python account_asset_async.py创建 account_asset.js 贴入下面的代码:
const { Config, TradeContext, OAuth } = require('longbridge')

async function main() {
  const oauth = await OAuth.build('your-client-id', (_, url) => {
    console.log('请访问此 URL 进行授权:' + url)
  })
  const config = Config.fromOAuth(oauth)
  const ctx = TradeContext.new(config)
  const resp = await ctx.accountBalance()
  for (const obj of resp) {
    console.log(obj.toString())
  }
}
main().catch(console.error)
运行
node account_asset.js创建 main.rs 贴入下面的代码:
use std::sync::Arc;

use longbridge::{oauth::OAuthBuilder, trade::TradeContext, Config};

#[tokio::main]
async fn main() -> Result<(), Box<dyn std::error::Error>> {
    let oauth = OAuthBuilder::new("your-client-id")
        .build(|url| println!("请访问此 URL 进行授权:{url}"))
        .await?;
    let config = Arc::new(Config::from_oauth(oauth));
    let (ctx, _) = TradeContext::new(config);
    let resp = ctx.account_balance(None).await?;
    println!("{:?}", resp);
    Ok(())
}
运行
cargo run创建 Main.java 贴入下面的代码:
import com.longbridge.*;
import com.longbridge.trade.*;

class Main {
    public static void main(String[] args) throws Exception {
        String clientId = "your-client-id";
        OAuth oauth = new OAuthBuilder(clientId)
                .build(url -> System.out.println("请打开此 URL 授权:" + url))
                .get();
        try (oauth;
             Config config = Config.fromOAuth(oauth);
             TradeContext ctx = TradeContext.create(config)) {
            for (AccountBalance obj : ctx.getAccountBalance().get()) {
                System.out.println(obj);
            }
        }
    }
}
运行
mvn compile exec:exec创建 main.go 贴入如下代码:
package main

import (
	"context"
	"fmt"
	"log"

	"github.com/longbridge/openapi-go/config"
	"github.com/longbridge/openapi-go/oauth"
	"github.com/longbridge/openapi-go/trade"
)

func main() {
	o := oauth.New("your-client-id").
		OnOpenURL(func(url string) { fmt.Println("请访问此 URL 进行授权:", url) })
	if err := o.Build(context.Background()); err != nil {
		log.Fatal(err)
	}
	conf, err := config.New(config.WithOAuthClient(o))
	// 或使用 API Key 环境变量:config.New()
	// 或不使用 ENV:config.New(config.WithConfigKey("YOUR_APP_KEY", "YOUR_APP_SECRET", "YOUR_ACCESS_TOKEN"))
	if err != nil {
		log.Fatal(err)
	}
	tradeContext, err := trade.NewFromCfg(conf)
	if err != nil {
		log.Fatal(err)
	}
	defer tradeContext.Close()
	ctx := context.Background()
	ab, err := tradeContext.AccountBalance(ctx, &trade.GetAccountBalance{})
	if err != nil {
		log.Fatal(err)
	}
	fmt.Printf("%+v\n", ab[0])
}
运行:
go mod tidy
go run ./
创建 account_asset.cpp 贴入下面的代码:
#include <iostream>
#include <longbridge.hpp>

#ifdef WIN32
#include <windows.h>
#endif

using namespace longbridge;
using namespace longbridge::trade;

static void
run(const OAuth& oauth)
{
    Config config = Config::from_oauth(oauth);
    TradeContext ctx = TradeContext::create(config);

    ctx.account_balance([](auto res) {
        if (!res) {
            std::cout << "failed: " << *res.status().message() << std::endl;
            return;
        }
        for (const auto& b : *res) {
            std::cout << b.currency << " " << (double)b.available_cash << std::endl;
        }
    });
}

int main(int argc, char const* argv[]) {
#ifdef WIN32
    SetConsoleOutputCP(CP_UTF8);
#endif

    const std::string client_id = "your-client-id";
    OAuthBuilder(client_id).build(
    [](const std::string& url) {
        std::cout << "Open this URL to authorize: " << url << std::endl;
    },
    [](auto res) {
        if (!res) {
            std::cout << "authorization failed: " << *res.status().message() << std::endl;
            return;
        }
        run(*res);
    });

    std::cin.get();
    return 0;
}
运行
g++ -std=c++17 account_asset.cpp -o account_asset -llongbridge && ./account_asset运行后,会输出如下:
[
  AccountBalance {
    total_cash: 503898884.81,
    max_finance_amount: 0.00,
    remaining_finance_amount: 501403229.49,
    risk_level: Some(1),
    margin_call: 0,
    currency: "HKD",
    cash_infos: [
      CashInfo {
        withdraw_cash: 501214985.15,
        available_cash: 501214985.15,
        frozen_cash: 584438.25,
        settling_cash: -3897793.90,
        currency: "HKD",
      },
      CashInfo {
        withdraw_cash: -25546.89,
        available_cash: -25546.89,
        frozen_cash: 295768.57,
        settling_cash: 2326.60,
        currency: "USD",
      }
    ]
  }
]
订阅实时行情
订阅行情数据请检查 开发者中心 - “行情权限”是否正确
- 港股 - BMP 基础报价,无实时行情推送,无法用 WebSocket 订阅
- 美股 - 纳斯达克 Basic 行情(只限 OpenAPI)
运行前访问 开发者中心,检查确保账户有正确的行情权限。
当你有正确的行情权限,看起来可能会是这样:

创建 subscribe_quote.py 贴入下面的代码:
from time import sleep
from longbridge.openapi import QuoteContext, Config, OAuthBuilder, SubType, PushQuote


def on_quote(symbol: str, quote: PushQuote):
    print(symbol, quote)


oauth = OAuthBuilder("your-client-id").build(
    lambda url: print(f"请访问此 URL 进行授权:{url}")
)
config = Config.from_oauth(oauth)
ctx = QuoteContext(config)
ctx.set_on_quote(on_quote)
ctx.subscribe(["700.HK", "AAPL.US", "TSLA.US", "NFLX.US"], [SubType.Quote])
sleep(30)
运行
python subscribe_quote.py创建 subscribe_quote_async.py 贴入下面的代码:
import asyncio
from longbridge.openapi import AsyncQuoteContext, Config, OAuthBuilder, SubType, PushQuote


async def on_quote(symbol: str, quote: PushQuote) -> None:
    print(symbol, quote)


async def main() -> None:
    oauth = await OAuthBuilder("your-client-id").build_async(
        lambda url: print(f"请访问此 URL 进行授权:{url}")
    )
    config = Config.from_oauth(oauth)
    ctx = AsyncQuoteContext.create(config, loop_=asyncio.get_running_loop())
    ctx.set_on_quote(on_quote)
    await ctx.subscribe(["700.HK", "AAPL.US", "TSLA.US", "NFLX.US"], [SubType.Quote])
    await asyncio.sleep(30)

if __name__ == "__main__":
    asyncio.run(main())
运行
python subscribe_quote_async.py创建 subscribe_quote.js 贴入下面的代码:
const { Config, QuoteContext, SubType, OAuth } = require('longbridge')

async function main() {
  const oauth = await OAuth.build('your-client-id', (_, url) => {
    console.log('请访问此 URL 进行授权:' + url)
  })
  const config = Config.fromOAuth(oauth)
  const ctx = QuoteContext.new(config)
  ctx.setOnQuote((_, event) => console.log(event.toString()))
  await ctx.subscribe(['700.HK', 'AAPL.US', 'TSLA.US', 'NFLX.US'], [SubType.Quote])
  await new Promise(() => {})
}
main().catch(console.error)
运行
node subscribe_quote.js创建 main.rs 贴入下面的代码:
use std::sync::Arc;

use longbridge::{
    oauth::OAuthBuilder,
    quote::{QuoteContext, SubFlags},
    Config,
};

#[tokio::main]
async fn main() -> Result<(), Box<dyn std::error::Error>> {
    let oauth = OAuthBuilder::new("your-client-id")
        .build(|url| println!("请访问此 URL 进行授权:{url}"))
        .await?;
    let config = Arc::new(Config::from_oauth(oauth));
    let (ctx, mut receiver) = QuoteContext::new(config);

    ctx.subscribe(["700.HK", "AAPL.US", "TSLA.US", "NFLX.US"], SubFlags::QUOTE)
        .await?;

    while let Some(event) = receiver.recv().await {
        println!("{:?}", event);
    }
    Ok(())
}
运行
cargo run创建 Main.java 贴入下面的代码:
import com.longbridge.*;
import com.longbridge.quote.*;

class Main {
    public static void main(String[] args) throws Exception {
        String clientId = "your-client-id";
        OAuth oauth = new OAuthBuilder(clientId)
                .build(url -> System.out.println("请打开此 URL 授权:" + url))
                .get();
        try (oauth;
             Config config = Config.fromOAuth(oauth);
             QuoteContext ctx = QuoteContext.create(config)) {
            ctx.setOnQuote((symbol, quote) -> {
                System.out.printf("%s\t%s\n", symbol, quote);
            });
            ctx.subscribe(new String[] { "700.HK", "AAPL.US", "TSLA.US", "NFLX.US" }, SubFlags.Quote).get();
            Thread.sleep(30000);
        }
    }
}
运行
mvn compile exec:exec创建 main.go,贴入一下内容:
package main

import (
    "context"
    "encoding/json"
    "fmt"
    "log"
    "os"
    "os/signal"
    "syscall"
    "time"

    "github.com/longbridge/openapi-go/config"
    "github.com/longbridge/openapi-go/quote"
)

func main() {
 // create quote context from environment variables
    conf, err := config.New()
    if err != nil {
        log.Fatal(err)
    }
    quoteContext, err := quote.NewFromCfg(conf)
    if err != nil {
        log.Fatal(err)
        return
    }
    defer quoteContext.Close()
    ctx := context.Background()
    quoteContext.OnQuote(func(pe *quote.PushQuote) {
        bytes, _ := json.Marshal(pe)
        fmt.Println(string(bytes))
    })
    quoteContext.OnDepth(func(d *quote.PushDepth) {
        bytes, _ := json.Marshal(d)
        if d.Sequence != 0 {
            fmt.Print(time.UnixMicro(d.Sequence/1000).Format(time.RFC3339) + " ")
        }
        fmt.Println(string(bytes))
    })

    // Subscribe some symbols
    err = quoteContext.Subscribe(ctx, []string{"700.HK", "AAPL.US", "NFLX.US"}, []quote.SubType{quote.SubTypeDepth}, true)
    if err != nil {
        log.Fatal(err)
        return
    }

    quitChannel := make(chan os.Signal, 1)
    signal.Notify(quitChannel, syscall.SIGINT, syscall.SIGTERM)
    <-quitChannel
}
运行:
go run ./创建 subscribe_quote.cpp 贴入下面的代码:
#include <iostream>
#include <longbridge.hpp>

#ifdef WIN32
#include <windows.h>
#endif

using namespace longbridge;
using namespace longbridge::quote;

static QuoteContext g_ctx;

static void
run(const OAuth& oauth)
{
    Config config = Config::from_oauth(oauth);
    g_ctx = QuoteContext::create(config);

    g_ctx.set_on_quote([](auto event) {
        std::cout << event->symbol
                  << " last_done=" << (double)event->last_done
                  << " volume=" << event->volume << std::endl;
    });

    std::vector<std::string> symbols = {"700.HK", "AAPL.US", "TSLA.US", "NFLX.US"};
    g_ctx.subscribe(symbols, SubFlags::QUOTE(), [](auto res) {
        if (!res) {
            std::cout << "failed to subscribe: " << *res.status().message() << std::endl;
        }
    });
}

int main(int argc, char const* argv[]) {
#ifdef WIN32
    SetConsoleOutputCP(CP_UTF8);
#endif

    const std::string client_id = "your-client-id";
    OAuthBuilder(client_id).build(
    [](const std::string& url) {
        std::cout << "Open this URL to authorize: " << url << std::endl;
    },
    [](auto res) {
        if (!res) {
            std::cout << "authorization failed: " << *res.status().message() << std::endl;
            return;
        }
        run(*res);
    });

    std::cin.get();
    return 0;
}
运行
g++ -std=c++17 subscribe_quote.cpp -o subscribe_quote -llongbridge && ./subscribe_quote运行后,会输出如下:
700.HK PushQuote {
    last_done: 367.000,
    open: 362.000,
    high: 369.400,
    low: 356.000,
    timestamp: "2022-06-06T08:10:00Z",
    volume: 22377421,
    turnover: 8081883405.000,
    trade_status: Normal,
    trade_session: Normal
}
AAPL.US PushQuote {
  last_done: 147.350,
  open: 150.700,
  high: 151.000,
  low: 146.190,
  timestamp: "2022-06-06T11:57:36Z",
  volume: 3724407,
  turnover: 550606662.815,
  trade_status: Normal,
  trade_session: Pre
}
NFLX.US PushQuote {
  last_done: 201.250,
  open: 205.990,
  high: 205.990,
  low: 200.110,
  timestamp: "2022-06-06T11:57:26Z",
  volume: 137821,
  turnover: 27888085.590,
  trade_status: Normal,
  trade_session: Pre
}
委托下单
下面我们做一次 委托下单 动作,我们假设要以 50 HKD 买入 700.HK 的数量为 100。
NOTE: 为了防止测试买入成功,这里演示给了一个较低的价格,避免成交。OpenAPI 操作均等同与线上交易,请谨慎操作,开发调试注意参数细节。
创建 submit_order.py 贴入下面的代码:
from decimal import Decimal
from longbridge.openapi import TradeContext, Config, OAuthBuilder, OrderSide, OrderType, TimeInForceType

oauth = OAuthBuilder("your-client-id").build(
    lambda url: print(f"请访问此 URL 进行授权:{url}")
)
config = Config.from_oauth(oauth)
ctx = TradeContext(config)

resp = ctx.submit_order(
    side=OrderSide.Buy,
    symbol="700.HK",
    order_type=OrderType.LO,
    submitted_price=Decimal(50),
    submitted_quantity=Decimal(200),
    time_in_force=TimeInForceType.Day,
    remark="Hello from Python SDK",
)
print(resp)
运行
python submit_order.py创建 submit_order_async.py 贴入下面的代码:
import asyncio
from decimal import Decimal
from longbridge.openapi import AsyncTradeContext, Config, OAuthBuilder, OrderSide, OrderType, TimeInForceType

async def main() -> None:
    oauth = await OAuthBuilder("your-client-id").build_async(
        lambda url: print(f"请访问此 URL 进行授权:{url}")
    )
    config = Config.from_oauth(oauth)
    ctx = AsyncTradeContext.create(config)
    resp = await ctx.submit_order(
        side=OrderSide.Buy,
        symbol="700.HK",
        order_type=OrderType.LO,
        submitted_price=Decimal(50),
        submitted_quantity=Decimal(200),
        time_in_force=TimeInForceType.Day,
        remark="Hello from Python SDK",
    )
    print(resp)

if __name__ == "__main__":
    asyncio.run(main())
运行
python submit_order_async.py创建 submit_order.js 贴入下面的代码:
const { Config, TradeContext, OrderType, OrderSide, Decimal, TimeInForceType, OAuth } = require('longbridge')

async function main() {
  const oauth = await OAuth.build('your-client-id', (_, url) => {
    console.log('请访问此 URL 进行授权:' + url)
  })
  const config = Config.fromOAuth(oauth)
  const ctx = TradeContext.new(config)
  const resp = await ctx.submitOrder({
    symbol: '700.HK',
    orderType: OrderType.LO,
    side: OrderSide.Buy,
    timeInForce: TimeInForceType.Day,
    submittedPrice: new Decimal(50),
    submittedQuantity: new Decimal(200),
  })
  console.log(resp.toString())
}
main().catch(console.error)
运行
node submit_order.js创建 main.rs 贴入下面的代码:
use std::sync::Arc;

use longbridge::{
    decimal,
    oauth::OAuthBuilder,
    trade::{OrderSide, OrderType, SubmitOrderOptions, TimeInForceType, TradeContext},
    Config,
};

#[tokio::main]
async fn main() -> Result<(), Box<dyn std::error::Error>> {
    let oauth = OAuthBuilder::new("your-client-id")
        .build(|url| println!("请访问此 URL 进行授权:{url}"))
        .await?;
    let config = Arc::new(Config::from_oauth(oauth));
    let (ctx, _) = TradeContext::new(config);

    let opts = SubmitOrderOptions::new(
        "700.HK",
        OrderType::LO,
        OrderSide::Buy,
        decimal!(200),
        TimeInForceType::Day,
    )
    .submitted_price(decimal!(50i32));
    let resp = ctx.submit_order(opts).await?;
    println!("{:?}", resp);
    Ok(())
}
运行
cargo run创建 Main.java 贴入下面的代码:
import com.longbridge.*;
import com.longbridge.trade.*;
import java.math.BigDecimal;

public class Main {
    public static void main(String[] args) throws Exception {
        String clientId = "your-client-id";
        OAuth oauth = new OAuthBuilder(clientId)
                .build(url -> System.out.println("请打开此 URL 授权:" + url))
                .get();
        try (oauth;
             Config config = Config.fromOAuth(oauth);
             TradeContext ctx = TradeContext.create(config)) {
            SubmitOrderOptions opts = new SubmitOrderOptions("700.HK",
                    OrderType.LO,
                    OrderSide.Buy,
                    new BigDecimal(200),
                    TimeInForceType.Day).setSubmittedPrice(new BigDecimal(50));
            SubmitOrderResponse resp = ctx.submitOrder(opts).get();
            System.out.println(resp);
        }
    }
}
运行
mvn compile exec:exec创建 main.go,贴入一下内容:
package main

import (
    "context"
    "fmt"
    "log"
    "os"
    "os/signal"
    "syscall"

    "github.com/shopspring/decimal"

    "github.com/longbridge/openapi-go/config"
    "github.com/longbridge/openapi-go/trade"
)

func main() {
    // create trade context from environment variables
    conf, err := config.New()
    if err != nil {
        log.Fatal(err)
    }
    tradeContext, err := trade.NewFromCfg(conf)
    if err != nil {
        log.Fatal(err)
        return
    }


    defer tradeContext.Close()

    // subscribe order status
    tradeContext.OnTrade(func(ev *trade.PushEvent) {
        // handle order changing event
    })

    ctx := context.Background()
    // submit order
    order := &trade.SubmitOrder{
        Symbol:            "700.HK",
        OrderType:         trade.OrderTypeLO,
        Side:              trade.OrderSideBuy,
        SubmittedQuantity: 200,
        TimeInForce:       trade.TimeTypeDay,
        SubmittedPrice:    decimal.NewFromFloat(12),
    }
    orderId, err := tradeContext.SubmitOrder(ctx, order)
    if err != nil {
        log.Fatal(err)
        return
    }
    fmt.Printf("orderId: %v\n", orderId)


    quitChannel := make(chan os.Signal, 1)
    signal.Notify(quitChannel, syscall.SIGINT, syscall.SIGTERM)
    <-quitChannel
}
运行:
go run ./创建 submit_order.cpp 贴入下面的代码:
#include <iostream>
#include <longbridge.hpp>

#ifdef WIN32
#include <windows.h>
#endif

using namespace longbridge;
using namespace longbridge::trade;

static void
run(const OAuth& oauth)
{
    Config config = Config::from_oauth(oauth);
    TradeContext ctx = TradeContext::create(config);

    SubmitOrderOptions opts{
        "700.HK",     OrderType::LO,        OrderSide::Buy,
        Decimal(200), TimeInForceType::Day,  Decimal(50.0),
        std::nullopt, std::nullopt,          std::nullopt,
        std::nullopt, std::nullopt,          std::nullopt,
        std::nullopt,
    };
    ctx.submit_order(opts, [](auto res) {
        if (!res) {
            std::cout << "failed: " << *res.status().message() << std::endl;
            return;
        }
        std::cout << "order id: " << res->order_id << std::endl;
    });
}

int main(int argc, char const* argv[]) {
#ifdef WIN32
    SetConsoleOutputCP(CP_UTF8);
#endif

    const std::string client_id = "your-client-id";
    OAuthBuilder(client_id).build(
    [](const std::string& url) {
        std::cout << "Open this URL to authorize: " << url << std::endl;
    },
    [](auto res) {
        if (!res) {
            std::cout << "authorization failed: " << *res.status().message() << std::endl;
            return;
        }
        run(*res);
    });

    std::cin.get();
    return 0;
}
运行
g++ -std=c++17 submit_order.cpp -o submit_order -llongbridge && ./submit_order运行后,会输出如下:
SubmitOrderResponse { order_id: "718437534753550336" }获取当日订单
创建 today_orders.py 贴入下面的代码:
from longbridge.openapi import TradeContext, Config, OAuthBuilder

oauth = OAuthBuilder("your-client-id").build(
    lambda url: print(f"请访问此 URL 进行授权:{url}")
)
config = Config.from_oauth(oauth)
ctx = TradeContext(config)
resp = ctx.today_orders()
print(resp)
运行
python today_orders.py创建 today_orders_async.py 贴入下面的代码:
import asyncio
from longbridge.openapi import AsyncTradeContext, Config, OAuthBuilder

async def main() -> None:
    oauth = await OAuthBuilder("your-client-id").build_async(
        lambda url: print(f"请访问此 URL 进行授权:{url}")
    )
    config = Config.from_oauth(oauth)
    ctx = AsyncTradeContext.create(config)
    resp = await ctx.today_orders()
    print(resp)

if __name__ == "__main__":
    asyncio.run(main())
运行
python today_orders_async.py创建 today_orders.js 贴入下面的代码:
const { Config, TradeContext, OAuth } = require('longbridge')

async function main() {
  const oauth = await OAuth.build('your-client-id', (_, url) => {
    console.log('请访问此 URL 进行授权:' + url)
  })
  const config = Config.fromOAuth(oauth)
  const ctx = TradeContext.new(config)
  const resp = await ctx.todayOrders()
  for (const obj of resp) {
    console.log(obj.toString())
  }
}
main().catch(console.error)
运行
node today_orders.js创建 main.rs 贴入下面的代码:
use std::sync::Arc;

use longbridge::{oauth::OAuthBuilder, trade::TradeContext, Config};

#[tokio::main]
async fn main() -> Result<(), Box<dyn std::error::Error>> {
    let oauth = OAuthBuilder::new("your-client-id")
        .build(|url| println!("请访问此 URL 进行授权:{url}"))
        .await?;
    let config = Arc::new(Config::from_oauth(oauth));
    let (ctx, _) = TradeContext::new(config);

    let resp = ctx.today_orders(None).await?;
    for obj in resp {
        println!("{:?}", obj);
    }
    Ok(())
}
运行
cargo run创建 Main.java 贴入下面的代码:
import com.longbridge.*;
import com.longbridge.trade.*;

class Main {
    public static void main(String[] args) throws Exception {
        String clientId = "your-client-id";
        OAuth oauth = new OAuthBuilder(clientId)
                .build(url -> System.out.println("请打开此 URL 授权:" + url))
                .get();
        try (oauth;
             Config config = Config.fromOAuth(oauth);
             TradeContext ctx = TradeContext.create(config)) {
            Order[] orders = ctx.getTodayOrders(null).get();
            for (Order order : orders) {
                System.out.println(order);
            }
        }
    }
}
运行
mvn compile exec:exec创建 main.go,贴入以下内容:
package main

import (
    "context"
    "fmt"
    "log"

    "github.com/longbridge/openapi-go/config"
    "github.com/longbridge/openapi-go/trade"
)

func main() {
    // create trade context from environment variables
    conf, err := config.New()
    if err != nil {
        log.Fatal(err)
    }
    tradeContext, err := trade.NewFromCfg(conf)
    if err != nil {
        log.Fatal(err)
    }
    defer tradeContext.Close()
    ctx := context.Background()
    // today orders
    orders, err := tradeContext.TodayOrders(ctx, &trade.GetTodayOrders{})
    if err != nil {
        log.Fatal(err)
    }

    for _, order := range orders {
        fmt.Printf("%+v\n", order)
    }
}
创建 today_orders.cpp 贴入下面的代码:
#include <iostream>
#include <longbridge.hpp>

#ifdef WIN32
#include <windows.h>
#endif

using namespace longbridge;
using namespace longbridge::trade;

static void
run(const OAuth& oauth)
{
    Config config = Config::from_oauth(oauth);
    TradeContext ctx = TradeContext::create(config);

    ctx.today_orders(std::nullopt, [](auto res) {
        if (!res) {
            std::cout << "failed: " << *res.status().message() << std::endl;
            return;
        }
        for (auto it = res->cbegin(); it != res->cend(); ++it) {
            std::cout << "order_id=" << it->order_id
                      << " quantity=" << it->quantity << std::endl;
        }
    });
}

int main(int argc, char const* argv[]) {
#ifdef WIN32
    SetConsoleOutputCP(CP_UTF8);
#endif

    const std::string client_id = "your-client-id";
    OAuthBuilder(client_id).build(
    [](const std::string& url) {
        std::cout << "Open this URL to authorize: " << url << std::endl;
    },
    [](auto res) {
        if (!res) {
            std::cout << "authorization failed: " << *res.status().message() << std::endl;
            return;
        }
        run(*res);
    });

    std::cin.get();
    return 0;
}
运行
g++ -std=c++17 today_orders.cpp -o today_orders -llongbridge && ./today_orders运行后,会输出如下:
Order {
  order_id: "718437534753550336",
  status: NotReported,
  stock_name: "腾讯控股 1",
  quantity: 200,
  executed_quantity: None,
  price: Some(50.000),
  executed_price: None,
  submitted_at: 2022-06-06T12:14:16Z,
  side: Buy,
  symbol: "700.HK",
  order_type: LO,
  last_done: None,
  trigger_price: Some(0.000),
  msg: "",
  tag: Normal,
  time_in_force: Day,
  expire_date: Some(NaiveDate(Date { year: 2022, ordinal: 158 })),
  updated_at: Some(2022-06-06T12:14:16Z),
  trigger_at: None,
  trailing_amount: None,
  trailing_percent: None,
  limit_offset: None,
  trigger_status: None,
  currency: "HKD",
  outside_rth: nonce
}
上面例子已经完整演示了如何使用 SDK 访问 OpenAPI 的接口,更多其他接口请详细阅读 Longbridge Developers 文档,根据不同的接口使用。
更多例子
我们在 Longbridge OpenAPI Python SDK 的 GitHub 仓库中提供了上面几个例子的完整代码,当然后期我们也会持续往里面补充或更新。
https://github.com/longbridge/openapi/tree/master/examples
SDK API 文档
SDK 的详细 API 文档请访问:https://longbridge.github.io/openapi/
反馈及沟通
如果您在使用 SDK 的过程中遇到任何问题,欢迎通过以下方式返回或与我们讨论,我们会尽力帮助您解决问题。
GitHub Issues
在 GitHub 上,也有很多历史的讨论和问题可以参考,你也可以试着搜索一下,或许也能找到问题的解决方案。